

Testing Your API
Zuplo provides multiple ways to test your API gateway at every stage of
development. Whether you are iterating locally, reviewing a pull request in a
preview environment, or gating production deployments in CI/CD, the
zuplo test command and the @zuplo/test library give you a
consistent testing experience.
Testing strategies overview
| Strategy | When to use | Endpoint target |
|---|---|---|
| Local testing | Fast feedback while developing | http://localhost:9000 |
| Preview environments | Validate changes on a real deployment before merging | https://<branch>-<id>.zuplo.app |
| CI/CD integration | Automated gate that blocks broken changes from reaching production | Deployment URL from your CI provider |
All three strategies use the same test files and the same zuplo test command.
The only thing that changes is the --endpoint value.
Local testing
Running tests against a local development server gives the fastest feedback
loop. Start the server with zuplo dev, then run your test
suite against it.
Starting the local server
Code
The API gateway starts on http://localhost:9000 by default. You can change the
port with the --port flag. See the zuplo dev reference for
all available options.
Running tests locally
With the dev server running, open a second terminal and run:
Code
The command discovers every *.test.ts file under the tests/ folder and
executes them against the provided endpoint.
You can filter which tests run with the --filter flag. For example,
npx zuplo test --endpoint http://localhost:9000 --filter 'auth' runs only
tests whose name contains "auth".
Testing with Zuplo services locally
Some features, such as API key authentication and rate limiting, require a
connection to Zuplo cloud services. To use these features in local development,
link your local project to an existing Zuplo project with
zuplo link:
Code
Follow the prompts to select your account, project, and environment. This
creates a .env.zuplo file that the dev server reads automatically. For local
development, selecting the development environment is recommended.
The .env.zuplo file can contain sensitive information. Add it to your
.gitignore file so it is not committed to source control.
Once linked, services like the API Key Authentication policy work locally using the same API key bucket as the linked environment. In the Zuplo Portal, open the Services tab in your project and select API Key Service to create API key consumers, then call your local gateway with the generated key:
Code
For more details see Connecting to Zuplo Services Locally.
Setting environment variables locally
Your local dev server does not have access to the environment variables
configured in the Zuplo Portal. Instead, create a .env file in your project
root:
.env
The Zuplo CLI loads these variables automatically when you run npx zuplo dev.
See
Configuring Environment Variables Locally
for more information.
Preview environments
Every branch pushed to your connected source control provider can create an isolated preview environment. Preview environments are full Zuplo deployments that behave the same as production, making them ideal for testing pull requests before merging.
Running tests against a preview environment
Pass the preview environment URL as the endpoint:
Code
Because preview environments run the full Zuplo runtime, including edge deployment, policies, and connected services, tests that pass here give high confidence that the changes work in production.
Combining local and remote testing
For maximum coverage, test locally first for fast iteration, then run the same test suite against the deployed preview environment:
- Start local development and run tests against
http://localhost:9000. - Push your branch. Zuplo deploys a preview environment automatically.
- Run
npx zuplo test --endpoint <preview-url>to verify behavior on the real edge deployment.
CI/CD integration testing
Automated tests in your CI/CD pipeline ensure that every deployment is validated
before changes reach production. The zuplo test command works with any CI
system.
The examples below use the Zuplo GitHub integration. If you prefer setting up your own CI/CD for more fine-grained control, see Custom CI/CD.
Testing after deployment with GitHub Actions
Using the Zuplo GitHub integration, tests can run after a deployment and block pull requests from being merged. The Zuplo Git Integration sets Deployments and Deployment Statuses for any push to a GitHub branch.
Here is a simple GitHub Action that uses the Zuplo CLI to run the tests after
the deployment is successful. Notice how the property
github.event.deployment_status.environment_url is set to the API_URL
environment variable. This is one way you can pass the URL where the preview
environment is deployed into your tests.
/.github/workflows/main.yaml
Requiring status checks
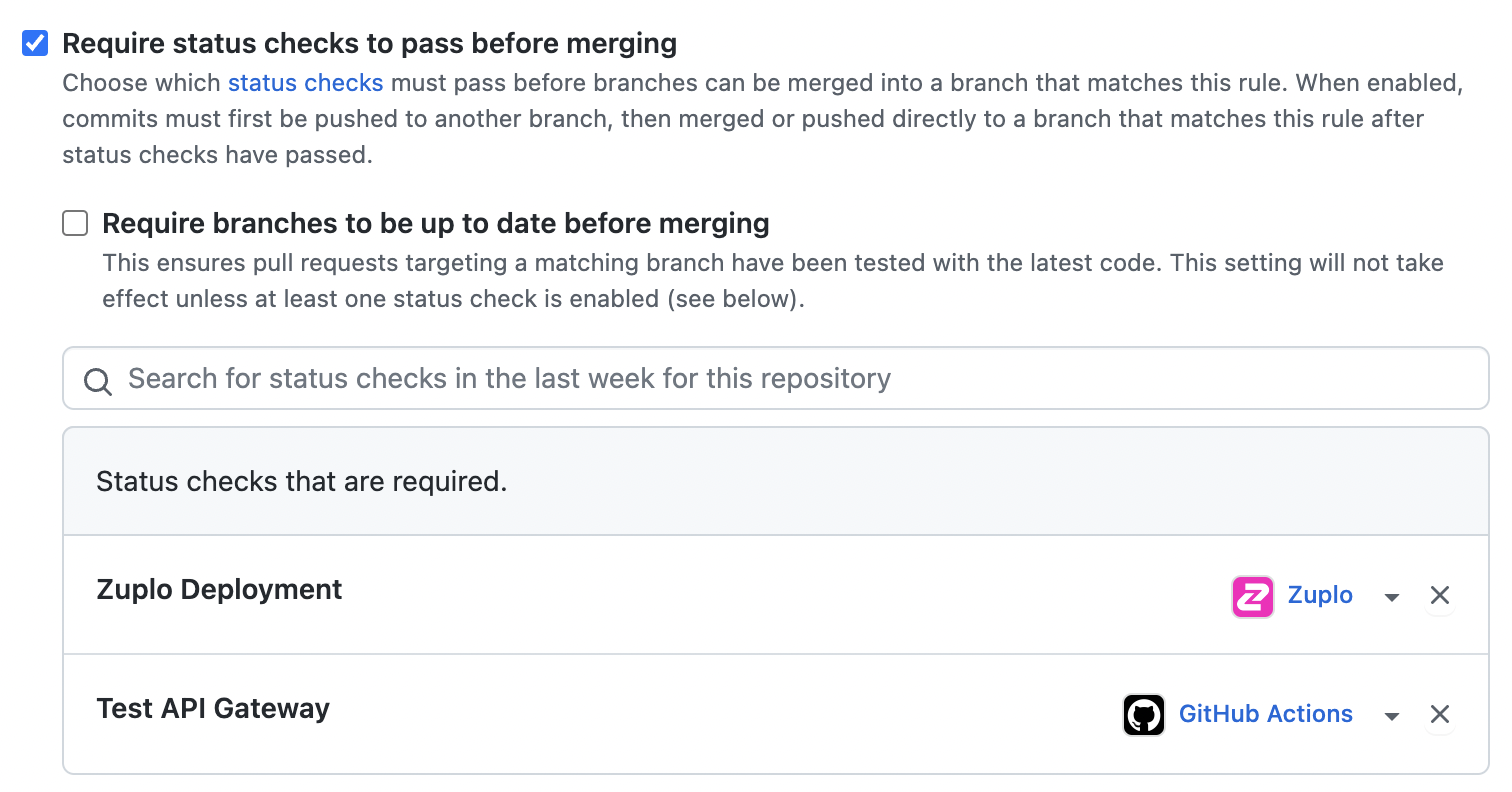
GitHub Branch protection can be set in order to enforce policies on when a Pull Request can be merged. The example below sets the "Zuplo Deployment" and "Test API Gateway" as required status that must pass.
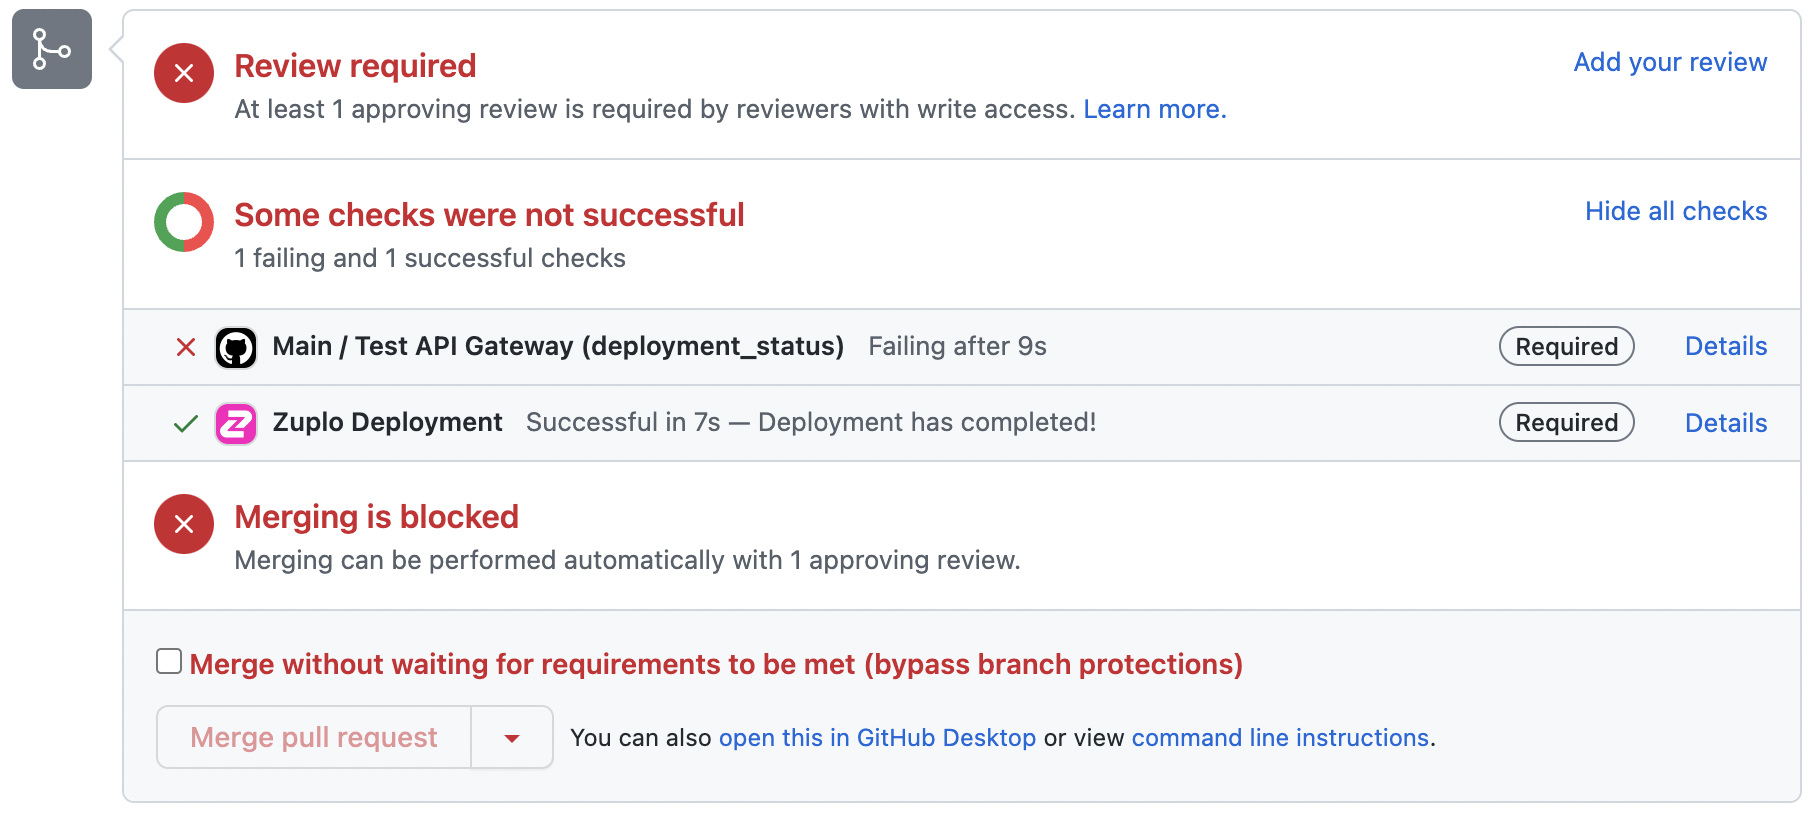
When a developer tries to merge their pull request, they will see that the tests haven't passed and the pull request can't be merged.
Local testing in CI
You can also run tests against a local Zuplo server inside your CI pipeline before deploying anywhere. This catches issues earlier and avoids deploying broken changes.
/.github/workflows/local-test-then-deploy.yaml
For CI/CD examples with other providers, see Custom GitHub Actions, GitLab CI/CD, and CircleCI.
Writing tests
Using Node.js 18 and the Zuplo CLI, it's very easy to write tests that make
requests to your API using fetch and then validate expectations with expect
from chai.
/tests/my-test.test.ts
Check out our other sample tests to find one that matches your use-case.
Your test files need to be under the tests folder and end with .test.ts to
be picked up by the Zuplo CLI.
Tips for writing tests
This section highlights some of the features of the Zuplo CLI that can help you write and structure your tests. Check out our other sample tests to find one that matches your use-case.
Ignoring tests
You can use .ignore and .only to ignore or run only specific test. The full
example is at
ignore-only.test.ts
/tests/ignore-only.test.ts
Filtering tests
You can use the CLI to filter tests by name or regex. The full example is at filter.test.ts
/tests/filter.test.ts
Using environment variables in tests
You can pass environment variables to your tests by setting them before the
zuplo test command. Inside your test files, access them with process.env:
Code
/tests/auth.test.ts
Writing integration tests
Integration tests verify that your API gateway behaves correctly end-to-end,
including routing, policies, and backend connectivity. Because zuplo test runs
against a live endpoint (local or deployed), every test is inherently an
integration test.
Testing response status and headers
/tests/headers.test.ts
Testing rate limiting
/tests/rate-limit.test.ts
Testing request validation
/tests/validation.test.ts
Unit Tests & Mocking
Advanced
Custom testing can be complicated and is best used only to test your own logic rather than trying to mock large portions of your API Gateway.
It's usually possible to use test frameworks like Mocha and mocking tools like Sinon to unit tests handlers, policies, or other modules. To see an example of how that works see this sample on GitHub: https://github.com/zuplo/zuplo/tree/main/examples/test-mocks
Do note though that not everything in the Zuplo runtime can be mocked. Additionally, internal implementation changes might cause mocking behavior to change or break without notice. Unlike our public API we don't guarantee that mocking will remain stable between versions.
Generally speaking, if you must write unit tests, it's best to test your logic separately from the Zuplo runtime. For example, write modules and functions that take all the arguments as input and return a result, but don't depend on any Zuplo runtime code.
For example, if you have a function that uses an environment variable and want to unit test it.
Don't do this:
Code
Instead do this:
Code
Then write your test like this:
Code
Polyfills
If you are running unit tests in a Node.js environment, you may need to polyfill some globals. Zuplo itself doesn't run on Node.js, but because Zuplo is built on standard API, testing in Node.js is possible.
If you are running on Node.js 20 or later, you can use the webcrypto module to
polyfill the crypto global. You must register this polyfill before any Zuplo
code runs.
Code